Firewalls
Firewalls allow you to explicitly control traffic to your slices. Firewalls are free, and can be managed using the simple management interface.
You can use the simple default firewall rules (described further below), or create firewalls with your own customized firewall rules. They can be assigned at slice creation to speed up deployments, and to mass-update rules at once across multiple slices.
Tip
Firewalls are strongly recommended. Even the default firewall rules for simple websites can help protect your slice.
Create Firewall
To create a new firewall, click the Create Firewall button. A window will open prompting for the following information:
- Firewall Name
Enter a descriptive name for your firewall.
- Slice
Choose an initial slice to assign to this firewall. This is optional and can be changed later.
Tip
Upon creation, all new firewalls are given a default set of rules suitable for running a website. Inbound traffic is allowed on ports 22 (SSH), 80 (HTTP) and 443 (HTTPS). ICMP (ping) is also allowed. All other traffic is dropped. These rules can be customized as described below.
Once created, your new firewall should show up in the firewalls list, which contains the following information:

- Name
Click any firewall name to bring up the Firewall Details.
- Rules
Total number of rules in this firewall. If there are any pending (unsaved) rules, this will also be displayed. See Saving Firewall Rules.
- Slices
Total number of slices assigned to this firewall.
- Created
When firewall was created (UTC).
- Rename
Click to rename this firewall. A window will open prompting for the new name. Click Update to apply.
- Delete
Delete firewall. You will be prompted to confirm. Once confirmed, the firewall will be deleted and all slices assigned to this firewall will be unassigned.
Delete Firewall
You can delete a firewall by clicking Delete for it in the firewalls list. You will be prompted to confirm. Once confirmed, all slices are unassigned from the firewall and it is removed from your account.
Warning
Careful when deleting a firewall that you do not inadvertently leave your slices unprotected.
Firewall Details
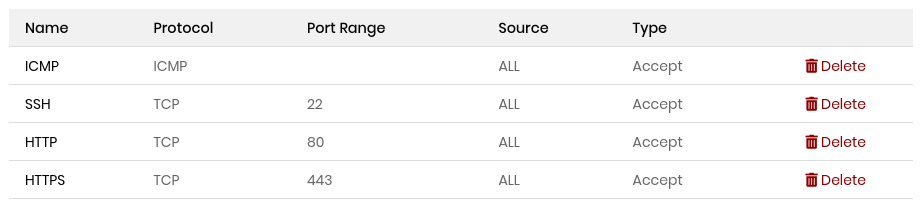
Click any firewall name to bring up it’s details. On the details page, you can edit the rules for the firewall, and manage which slices it is assigned to. Here is a screenshot of the default Inbound firewall rules. This allows ping (ICMP), SSH (port 22), HTTP (port 80) and HTTPS (port 443). All other traffic is dropped:
Delete Firewall Rules
To delete a rule, click Delete on the row for that rule. The row for the rule will turn pale red to indicate it is to be deleted. Changes are not applied until they are saved.
Edit Firewall Rules
You can edit both inbound and outbound firewall rules.
Important
Only traffic specified in your rules will be allowed. All other traffic will be dropped.
Note
A maximum of 250 rules are allowed per firewall.
Inbound Rules
Click Add Inbound Rule to open the add rule window. There is a selection box at the top of the window for a number of presets for common services. Selecting one will auto-populate the other fields with the correct values.
Name: Give your rule a descriptive name.
Protocol: Can be TCP, UDP or ICMP. If ICMP is selected, then ports do not apply.
Source: Enter a specific IP address, or a range specified using CIDR netmask, or “all” to match all IPs.
Type: Drop (block), or Accept (allow). Rules of Drop type are checked first.
Click Create Rule. The new rule should show up in the table.
Important
Rules which have been created but have not yet been applied will show with a pale blue background. Changes are not applied until they are saved.
Outbound Rules
Click Add Outbound Rule to open the add rule window. There is a selection box at the top of the window for a number of presets for common services. Selecting one will auto-populate the other fields with the correct values.
Name: Give your rule a descriptive name.
Protocol: Can be TCP, UDP or ICMP. If ICMP is selected, then ports do not apply.
Destination: Enter a specific IP address, or a range specified using CIDR netmask, or “all” to match all IPs.
Type: Drop (block), or Accept (allow). Rules of Drop type are checked first.
Click Create Rule. The new rule should show up in the table.
Important
Rules which have been created but have not yet been applied will show with a pale blue background. Changes are not applied until they are saved.
Saving Firewall Rules
Rules must be saved in order to be applied.
Rules which have been created but not yet applied will have a pale blue background. Rules which have been deleted but not applied will have a pale red background.
If you have modified firewall rules which are unapplied, the Save and Cancel buttons on the bottom left of the page will be enabled. Firewall changes are not applied until you save them. Once you are ready to apply your changes, click the Save button at the bottom of the page. The changes will be applied and deployed to all slices assigned to the firewall.
Cancel / Revert Rule Changes
If you have made changes and decide you want to cancel your changes and revert, you can do this if you have not yet saved your changes. Click the Cancel button to restore all of the rules back to what they were before you started making changes.
Firewall Slices and symBalancers
Click the Slices or symBalancers tab at the top of the firewall details page to manage slices and/or symBalancers this firewall is assigned to.
Note
A maximum of 20 slices are allowed per firewall.
Add Slice to Firewall
To add a slice to a firewall, select the slice you would like to add in the dropdown box and click Add to Firewall.
Delete Slice from Firewall
To remove a slice from a firewall, simply click Remove in the row for that slice. A confirmation dialog will prompt to confirm. Once confirmed, the slice is removed from the firewall.